January has been plum full of visitors! My sister Jenna was here from January 2nd to the 12th and then my dear college friend Rachel arrived on the 12th and stayed until the 21st. Talk about non-stop hostessing! Oh, and did I mention that my in-laws arrive in 4 days for a month-long stay??? I love having visitors but I’m not going to pretend that it isn’t exhausting, especially now that I have the baby to tend to also…
Jenna and Rachel had very different ways they wanted to spend their time. Jenna was all about adventure experiences, tanning and Nia time. Rachel, on the other hand, was all about the Lima food experiences. We did our best to satisfy her wish.
She tried her first Pisco Sour and Ceviche at Gaston Acurio’s La Mar Cevicheria, took a cooking class with Nick at SkyKitchen and insisted on the truffle-making class at the Choco Museum.

I was a huge fan of the Bean to Bar Class I had taken with Jenna the week before and couldn’t see what the Truffle-making Class had in store for us! What was great about taking both classes was that they each covered different things. In this class, we learned how to temper the chocolate (stabilize it) and make the ganache filling that goes inside a truffle.
Tempering is a process of heating the chocolate to 43 degrees Celsius, cooling it to 28 degrees Celcius and then bringing the temp up one more time to 31.5 degrees Celcius (careful, if you go over 32 degrees Celsius you’ve overcooked it and have to start the tempering all over again – guess if we might have done that???)

When cooling the chocolate down to 28 degrees Celsius, it’s best to do it by spreading it out on a marble slab, although you can also do it in the fridge if you’re lacking marble.

The process involves repeatedly spreading the chocolate and then collecting it again, taking temperature readings throughout.

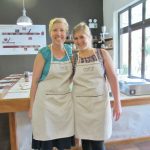
Here I am using a fancy-pants thermometer to test our chocolate (we had to put it in the fridge because it wasn’t getting cool enough on the marble with the sun shining in). A candy thermometer works just as well.
We had previously made our ganache to go in the center of the truffle. Ganache consists of 2/3 chocolate + 1/3 cream and whatever you want to flavor it with (in our case, crushed coffee). You heat the cream to boiling with the crushed coffee in it, then pour the cream/coffee mixture into the warmed chocolate, capturing the coffee bits in a strainer. Next step is to let it cool for 5 hours and then mold it into balls for the center.

We had the good fortune of making both ball truffles and molded candies with ganache centers. In the photo above we’re coating the mold with the chocolate so that it will form a hard shell around the ganache. For the molds, you don’t let the ganache cool for 5 hours, you simply use it while it’s in a lukewarm, pliable state. Once we had filled the chocolate-coated mold with our ganache center, we sealed it up by putting another chocolate layer on top.

Once cool, we had to pop our molded candies out of their shells.

We also convinced them to let us paint them using this wicked-cool silver and gold candy paint. Check out those pyramids! Pretty sure we were just supposed to dust the candy, but it looked so pretty caked on…

The final step for the Truffle balls was to dip the hardened ganache centers into the warm chocolate and tap them off, creating a smooth chocolate coating. We then were free to decorate them with a variety of toppings.

Look at my beauties below. The toppings I chose are, from left to right: Quinoa (a Peruvian grain), Sea Salt, M & M’s, Chili Powder, Coffee Bean, & Coconut!

Not gonna lie, I am insanely in love with this place. Where else can you do a 2 hour fun workshop and then get to take home 12 pieces of AMAZING hand-crafted chocolate! I’m thinking about doing a Valentine’s Day class next. Any takers?